Contents
Domain email AWS – How to do it
You can send and receive emails on your own domain in AWS. It ends up costing practically nothing, but does require a few bits of set-up.
Lets say your domain is example.com and your regular email address is you@gmail.com.
First you have to configure AWS so that emails to anything@example.com get forwarded to you@gmail.com. Then you need to configure Gmail to let you send emails as anything@example.com.
PS, “anything” means anything. Any emails to info@example.com or sales@example.com or foobar@example.com will all be processed. For sending, you need to configure your email client for each address you want to send as.
“Domain email AWS” is a common query but AWS has no built-in quick-and-easy support for it. AWS themselves have finally created a guide for setting up AWS domain email, but there are problems with it. It’s a little hard to follow and the Lambda function they offer for forwarding emails can only send to one address and sends the original email as a .eml file attachment. This means that you have to download and then open the attachment in a suitable mail application to see the original email. That’s not ideal.
There is a much better solution here, and this is the one we will use. With this forwarder you can send to multiple recipients and the email is sent just like an ordinary email that you can immediately read and reply to.
You can configure rules for how emails are forwarded. You can forward emails to different destinations depending on the original target address, so emails for sales@example.com could go to a different place than emails to support@example.com.
You can also forward each email to multiple addresses.
Domain email AWS setup – High level view
- A DNS entry causes emails to your domain to be routed to AWS Simple Email Service (SES)
- An SES rule saves the email to an AWS S3 bucket and triggers a Lambda function
- The AWS Lambda function reads the message and forwards it to you via SES
Be advised that there is a 10MB size limit on emails (send or receive) through SES.
In this guide we assume that you are hosting your domain on AWS Route 53. If you’re using a different DNS you will have to make the DNS changes manually following instructions that you will see in AWS. We give instructions for configuring Gmail to send emails on your domain. For other email clients the principle is the same and you need the same details from AWS, but the settings in your email client will be in a different place.
Costs for AWS email forwarding
If you received 10,000 2KB emails per month it would cost you APPROXIMATELY:
- $1 for SES
- $0.10 for S3
- $0.10 for Lambda
These are just indications. You should take care to ensure that you understand AWS pricing and that only you are responsible for any bills you incur.
The cost would be lower if you are on the free tier.
Remove restrictions on sending emails in SES
If you haven’t used SES before then your account will be in the sandbox. This limits you to only sending emails that you verify in advance. To send emails to any address, you have to submit a request to move out of the sandbox.
If your AWS account is brand new this request may be rejected. If you’ve been using AWS, and paying your bills, for a while then you should be approved.
- On the SES management console page
- Choose Sending statistics
- Click Request a Sending Limit Increase
Complete the form following these instructions
Verify your domain on SES
- In the SES management console page
- Change to the region closest to you. If you’re a UK user, London isn’t supported yet, so choose Ireland
- Choose Domains from the left menu
- Click Verify a new domain
- Enter your domain name
- Click Verify this domain
You will be shown two DNS records that you need to add. If you’re using Route 53 you can click on Use Route 53 to have it done automatically – be sure to tick both the checkboxes so that both the Domain Verification Record and the Email Receiving Record are created.
Your domain will show as pending verification until the DNS records propagate. Take a look at the hosted zone for your domain in Route 53 and you’ll see the two new records. The MX record is the one that causes emails to your domain to be sent to SES
Verification should complete in a few minutes if you’re using Route 53. Once verified, you can move on.
Set up the S3 Bucket
When an email is received by SES it gets copied into an S3 bucket. You need to create a bucket and set the permissions so that SES can store emails in it.
You will need your AWS account id first:
- Under your user name in the top right, go to My Account
- Copy the numeric Account Id
In S3:
- Click Create Bucket
- Enter a name such as mail.example.com
- Make sure the correct region is chosen (the same region as you chose for SES)
- Click Create
- Click into the bucket you just created
- Go to Permissions, Bucket Policy
- Enter the policy given below after changing 2 things:
- replace <bucketName> with your bucket name
- replace <awsAccountId> with your numeric account id
{
    "Version": "2012-10-17",
    "Statement": [
        {
            "Sid": "AllowSESPuts",
            "Effect": "Allow",
            "Principal": {
                "Service": "ses.amazonaws.com"
            },
            "Action": "s3:PutObject",
            "Resource": "arn:aws:s3:::<bucketName>/*",
            "Condition": {
                "StringEquals": {
                    "aws:Referer": "<awsAccountId>"
                }
            }
        }
    ]
}
Create the Lambda function that will forward emails
You will need the Lambda function code from the GitHub project here
- Open the Lambda management console page
- Make sure the region is set to the same one you have been using so far
- Click Create function
- Select Author from scratch
- Enter a function name like SesForwarder
- Select NodeJS 12.x as the runtime
- Click Create Function
- Copy the code into the lambda function code editor, deleting whatever is already there
Near the top is the config that you need to change:
var defaultConfig = {
  fromEmail: "you@gmail.com",
  subjectPrefix: "",
  emailBucket: "s3-bucket-name",
  emailKeyPrefix: "",
  forwardMapping: {
    "@example.com": [
      "you@gmail.com"
    ],
  }
};- Change fromEmail to your own email address eg you@gmail.com. This has to be an account you already have where you can receive emails, because it has to be verified
- Change emailBucket to the bucket you created
- Leave emailKeyPrefix blank
- In forwardMapping, create an entry as shown, using your domain name
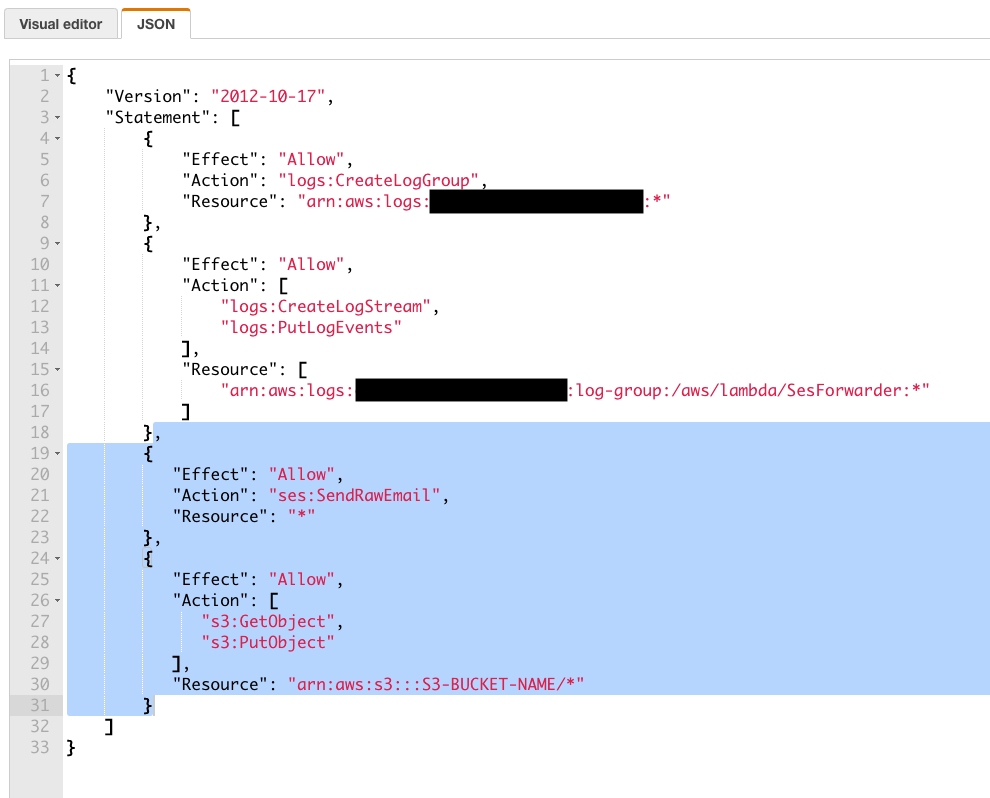
Now we have to modify the permissions for the Lambda function so that it can use SES and S3.
- Scroll down to Execution role
- Open the link to “View the blah-role on the IAM console” in a new tab
- Expand the policy and click Edit policy
- Select the JSON view
- Add the following JSON as shown in blue in the image, setting your bucket name. Note the comma at the start which continues from the existing policy code
- Click Review policy and Save changes
- Go back to your Lambda function and save it
      ,
      {
         "Effect": "Allow",
         "Action": "ses:SendRawEmail",
         "Resource": "*"
      },
      {
         "Effect": "Allow",
         "Action": [
            "s3:GetObject",
            "s3:PutObject"
         ],
         "Resource": "arn:aws:s3:::BUCKET-NAME/*"
      }
Verify email addresses
The email addresses you chose for MailSender and MailRecipient have to be verified in SES before you can use them.
- In the SES management console page
- Click Email Addresses then Verify a New Email Address
- Enter the email address you want to use. This has to be one where you can receive emails
- Click Verify This Email Address
- Check your email and complete the verification
Configure SES to handle emails
Now we’ll tell SES what to do when an email comes in: Copy it to your S3 bucket and invoke your Lambda function
- In the SES management console page
- Click Rule Sets
- Click Create a Receipt Rule
- For the recipient, specify your domain name to process all emails to your domain, eg example.com
- Click Next step
- On the Actions page, choose S3 as the action type
- Select your S3 bucket
- Leave the other fields as is
- Add a Lambda action
- Select your Lambda function
- Leave the other fields as is
- Click Next Step
- Enter a sensible value for the Rule name
- Tick Enabled and Enable spam and virus scanning
- Leave the other fields
- Click Next Step
- Check the details and click Create Rule
You will probably get a Missing Permissions error. Just click Add permissions.
Your email forwarder is now enabled.
Verify the setup
Send an email to anything@yourdomain.com
If everything is properly configured, you should see an entry appear in the S3 bucket, and an email should be forwarded to your chosen address.
If it isn’t working, go to your Lambda function, click to the monitoring tab, then click View logs in Cloudwatch. Open the latest log entry and look for errors.
It may take a few minutes for the email to come through.
When you receive emails, if you inspect the details you will see that it appears to be from you@gmail.com (or whatever address you used as the fromEmail in the Lambda function) but the reply-to address is the address of the sender.
If you reply to the email, it will reply to the original sender. The reason that the from address is your own is because although SES can receive email from anyone (once you’re out of the sandbox) it can only send emails from verified addresses. This is why in the setup you had to verify your own email address and tell the Lambda function to use that address as the fromEmail.
Configure your email client to send emails as your domain email
- In the SES management console page
- Click SMTP settings then Create my SMTP Credentials
- Enter a sensible name for the user and click Create
- Click Show User SMTP Security Credentials
- Make a copy of the SMTP Username and SMTP Password and keep it safe because you won’t be able to access it again
- Also make a note of the Server Name shown on the SMTP Settings screen
Instructions for GMail
- Go to settings, Accounts and Import
- Under Send mail as, click Add another email address
- Enter the domain email address you want to send as, eg info@example.com
- Ensure Treat as an alias is checked
- Click Next step
- Enter the server name for your region. You can get this on the SMTP Settings page in SES, eg email-smtp.eu-west-1.amazonaws.com
- Enter the SMTP username and password you previously obtained
You will shortly receive a verification code email. Copy the code and click Verify.
It seems to work best if you now reload your gmail page before trying to send an email. Compose a message. Click the down arrow next to the from address and choose your new domain email address. Send a test email to yourself. While you are in the sandbox you will only be able to send emails to the email addresses you have already verified in SES.
Set a rule to auto delete old entries from S3 storage
Those emails will build up in your S3 bucket. Unless you particularly want to keep them even though you’ve received them in your usual email account, you can set a rule to automatically delete them. This will mean you’re not spending money storing old emails in S3 that you never access.
What you have to do is set a lifecycle rule which expires the entries after a number of days, say 30 days, and then deletes expired entries after some days, say 1 day.
- In your S3 bucket, click the Management tab
- Click Add lifecycle rule
- Give it a name eg cleanup, click Next
- Select both types of transition, click next
- On Expiration tick Current version and enter 30 for the number of days (or your chosen maximum age)
- Tick Previous versions and enter 1 for the number of days (or you chosen retention period)
- Click Next and Save
This “domain email AWS” guide is part of a series of tutorials for using AWS WordPress.
Prevent spammers spoofing your domain email
There are a few more important steps. If you don’t properly configure DKIM settings then spammers can send emails pretending to be from your domain.
DKIM attaches a digital signature for a similar purpose. The receiving mail server can retrieve the public DKIM key from DNS and verify the signature.
Without this, you may suffer two things. One, mail servers may start blacklisting your domain due to volumes of spam email claiming to be from your domain. Two, when a spam email gets bounced by the receiving mail system, it will come back to you because it looks like you were the sender.
See this article for the correct settings to prevent email spoofing.
FAQ
Can you send and receive email on your own domain with AWS?
Yes, but not with AWS Simple Email Service by itself – You also need a Lambda function to forward emails to your gmail or other account.
How much does it cost to have email on your domain at AWS?
It depends on how many emails you send and receive, and how big they are. Expect 10,000 emails per month to cost somewhere between $1 and $1.50.
With AWS domain email forwarding, what are the limits for sending and receiving?
Until you request to be moved out of the email sandbox, you can only send to and receive from email addresses that you verify in SES. Once your request to leave the sandbox has been approved, you can send to and receive from any address, up to the limits granted. Limits may be a maximum number per day, and/or a maximum send rate per second. You can apply for increased limits. You must adhere to the AWS SES policies that prevent spamming and protect privacy.
Is there a size limit for emails through AWS SES Simple Email Service?
Yes. The size limit is 10MB per email, send or receive.